Documentation
- 1-2. Introduction & Features
- 3. Commands Reference
- 4. Requirements & Installation
- 5. Update / Reinstall
- 6. Settings
- 7. Panel Parameters
- 8. Parts Configurator
- 9. Machining Drawings
- 10. Running FastNesting
- 11. Export & Reports
- 12. Reading Rhino Layout
- 13. Troubleshooting & Support
- A. Best Practices
- B. Purchase & Invoice
- C. FAQ
This documentation is adapted to FastNesting version 1.2.0.3.
1-2. Introduction & Features
FastNesting is an optimization plugin for Rhinoceros 3D that helps furniture workshops move from a 3D model to nested layouts, cut lists, labels, and technical reports without leaving Rhino.
From 3D model to nested Rhino layout with cut list report. This online manual is kept current for version 1.2.0.3.
3. Command Reference
FastNesting
Main command to start the nesting process. Select your pieces first, then run this command. FastNesting opens the Selected Parts Configurator, then the Export Report dialog, and runs nesting and layout drawing. Panel parameters and units from Settings apply by default. See §10 Running FastNesting for the full workflow.
License_FastNesting
Activate your PRO license or view your current license status. The dialog shows your computer alias (a readable name for this install), license level, and Deactivate License when PRO is active. If you are on the Free edition and a PRO trial is available, you will also find a link there to request a PRO trial — FastNesting will ask for your email address to confirm eligibility. If all seats are already in use, FastNesting offers to release a remote seat and activate this computer in one flow. Deactivating releases this machine so you can activate elsewhere or re-activate here after reinstalling.
Settings_FastNesting
Opens the Settings dialog: report units, default panel parameters (with Edit to open Panel Parameters), fraction precision, layout label sizes, density unit (PRO), and (PRO / Trial) 3D piece numbers on source solids after nesting. PRO also offers Distinguish by machining for piece numbering. Panel per material is set from the piece list dialog.
Clean_FastNesting
With no selection (press Enter at the prompt): Asks whether to reset FastNesting settings to defaults. If you choose Yes, all plugin settings are restored to their default values. Restart Rhino afterward so that dialogs show the updated values.
With objects selected: Removes FastNesting metadata from the selected objects. Choose an option:
- PreserveNames — Removes FastNesting metadata but keeps the piece name (
FN_Name) and Rhino object name. - ClearNames — Same as above and also clears the piece name and Rhino object name.
The command only deletes user data (e.g. FN_*, Rotar_Pieza, Skip); it does not change the geometry.
GroupEdit_FastNesting
Opens the Group Edit dialog so you can rename Rhino groups and subgroups without ungrouping. The edited names are saved back to Rhino and appear in the Selected Parts Configurator, Excel reports, PDF reports, and labels.
Show3DPieceNumbers_FastNesting New
After a nesting run, add or refresh Text dots on source 3D solids with their nesting list numbers. Run the command with no selection and type a piece number at the prompt — Rhino selects and zooms to that solid. With objects selected, only those solids receive or update 3D labels. Labels live on the FastNesting → 3D piece numbers layer. For automatic labeling after every nesting, enable 3D piece numbers on source solids in Settings_FastNesting.
What's New in 1.2.0.3
Show3DPieceNumbers_FastNesting: type a nesting list number and Rhino zooms to that source solid. With a selection, only those parts receive 3D labels. Optional auto-labeling after nesting is in Settings.License Types
Basic Features
- Up to 16 pieces
- Basic nesting & Rhino reports
- No edge banding (R/F)
- No PDF/Excel export
- No machining drawings
- No panel params per material
After trial expires
All Features Included
- No fixed piece-count limit for PRO nesting
- Edge banding (R/F) calculation
- PDF & Excel export
- Machining drawings (2D)
- Panel parameters per material
- Part clearance & estimated weight
- Smart labeling system
- Mult copies & 3D piece-number labels
4. System Requirements & Installation
System Requirements
- • Windows: Rhinoceros 7 or 8
- • macOS: Rhinoceros 8
- • RAM: Minimum 4 GB; recommended 8 GB for normal use, 16 GB for demanding Machining Drawings projects
- • Internet: Required for PRO license activation and deactivation
FastNesting can be downloaded from Food4Rhino, our official Rhinoceros 3D plugin marketplace, from here, or installed directly within Rhino using the Package Manager.
To install via Package Manager
- Ensure you have Rhinoceros 7 (Windows) or Rhinoceros 8 (Windows or Mac). FastNesting is available in the Package Manager on Rhino 7 (Windows) and Rhino 8 (Windows/Mac).
- Open Rhino.
- In the command line, type
PackageManagerand press Enter. - In the search bar, type FastNesting.
- Click Install and restart Rhino if prompted.
FastNesting will start in trial mode until the trial period expires, after which it will switch to the Free version or can be activated as the Pro version.
To install from a download
If you prefer to install from a direct download instead of Package Manager, get the file from our website or Food4Rhino:
- Rhino 8 (Windows/Mac): Download the
.yakfile. Uninstall any previous version from Package Manager first, then open Rhino and drag the .yak file onto the Rhino viewport. Restart Rhino if prompted. On Mac, FastNesting runs on Rhino 8 only. - Rhino 7 (Windows only): You can install via Package Manager (see above) or download the
.rhifile: close Rhino completely, then double-click the .rhi file to run the installer. Reopen Rhino when done.
5. Update / Reinstall
Recommended (Mac and Windows): Use Rhino's Package Manager. In Rhino, run the PackageManager command, uninstall the previous FastNesting version, then install the new one. Your license is not affected and should register automatically. Restart Rhino after the update so the new version loads correctly.
Manual installation
- Rhino 8 (Mac and Windows): Use the
.yakpackage. Download it from our website or Food4Rhino. Uninstall the previous version from Package Manager first, then open Rhino and drag the .yak file onto the Rhino window to install. On Mac, FastNesting runs on Rhino 8 only. - Rhino 7 (Windows only): Use Package Manager (uninstall the old version, then install the new one) or the
.rhiinstaller: download it, then double-click to run the installer.
If you see problems or suspect corrupted files from an older install, remove the plugin folder before reinstalling: in Rhino go to File → Properties (or Rhino → Preferences on Mac), open Plug-ins, find FastNesting in the list, right-click it and choose Open containing folder. Delete only the contents of the FastNesting folder (do not delete files outside that folder), then install again using Package Manager or the manual method above. For Rhino 7 with .rhi, if the installer does not behave correctly, use this same folder cleanup and then reinstall.
In all cases: Restart Rhino after uninstalling and again after installing so that changes take effect.
Keeping your license and settings when updating
In most cases your PRO license and settings are preserved when you update: after installing the new version, open Rhino and your license should still be active.
If you have licensing problems after updating
If after updating you see license errors, "invalid license", or the plugin does not recognize your PRO license, do the following to reset and re-activate on this computer:
- In Rhino, run
License_FastNesting. - Click Deactivate License. This releases this computer from your license, so you can activate on another computer or re-activate here after reinstalling.
- If you installed via Package Manager: open Rhino, go to Tools > Package Manager, search for FastNesting, click Uninstall, then close Rhino. Otherwise, close Rhino.
- Install the new version of FastNesting (see How to update above).
- Open Rhino, run
License_FastNesting, and activate again with your same email and license key.
This process is the same on Windows and Mac. Your license key is not lost; you are only deactivating this machine so you can activate again cleanly.
6. Settings
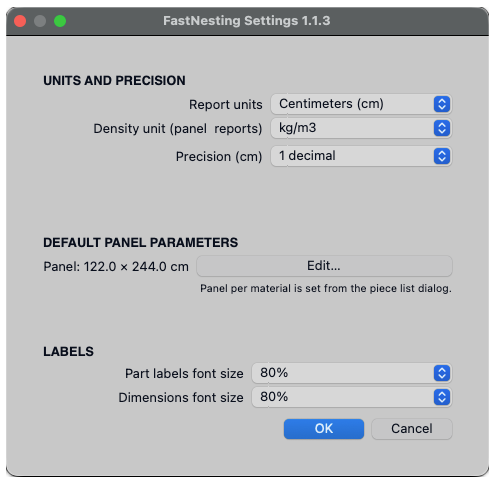
Panel parameters and units are centralized in Settings. Open it from the main FastNesting dialog or by running Settings_FastNesting. Here you set report units (mm, cm, or in), default panel parameters (with an Edit button that opens Panel Parameters), fraction precision for inches, drawing and labels (part and dimension font sizes, optional 3D piece numbers on source solids, and Distinguish by machining for numbering), and density unit (PRO). Panel per material is configured from the piece list dialog.

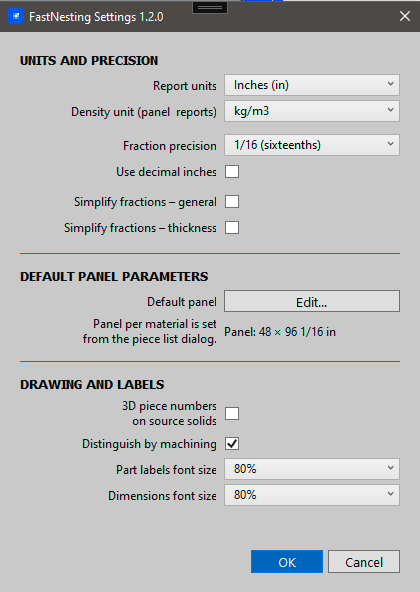
System Units / Report Units
Report units (millimeters, centimeters, or inches) are set in Settings. This is the standard for all outputs. On first run you may see a units step; afterward, change it anytime via Settings.
Important: Ideally, set the Rhino document to "Small Objects".
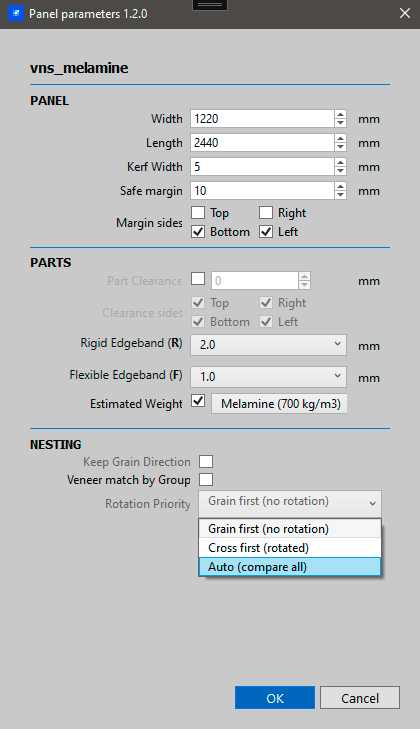
7. Panel Parameters
Open Panel Parameters from Settings (Edit next to default panel parameters), from the Selected Parts Configurator, or by running FastNestingPanelParameters.
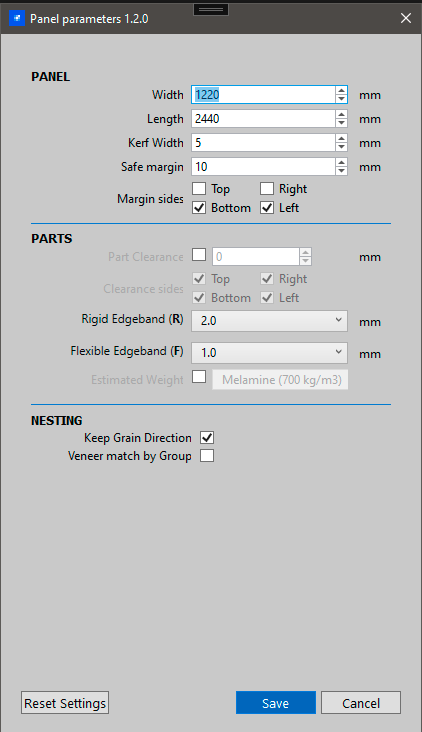
- Panel Size: Set sheet length and width — thickness is detected automatically from your Rhino model.
-
Blade Kerf: The customizable width of your cutting tool. Common values:
- 0.3 cm (3mm) Standard for most CNC router bits and thin kerf saw blades.
- 1/8" for imperial measurements: Common for full kerf saw blades.
- Safe Margin: The customizable edge margin to avoid damage. Typical: 0.5cm (5mm) or 1/4"
- Part Clearance (PRO): Optional cutting margin per piece; configurable here and in Settings.
-
Edge Banding Thickness: Select from the most common thicknesses for your edge material.
If you plan to use edge banding, you should verify or adjust these values for the desired type R or F.
Default values:- Rigid (R): For thick edge banding (2mm) | (5/64 in)
- Flexible (F): For thin edge banding (1mm) | (3/64 in)
- Preset 0 mm (R / F): Cut and finished nesting sizes stay the same while you still designate edges for exports (L1/L2/W1/W2 and R/F) — useful when banding thickness is handled outside the nest.

Visual representation of edge banding applied to nesting layouts.
- Keep Grain Direction: Enable when working with wood veneer to maintain grain alignment along the length. When this is off, Rotation Priority appears: Grain first (no rotation), Cross first (rotated), or Auto (compare all) — Auto tries more layouts and keeps the best (PRO / Trial).
- Veneer match by Group (PRO): When enabled, the nesting algorithm prioritizes keeping parts from the same assembly close together.
- Estimated weight in reports (PRO): When enabled, reports can include an estimated weight for the nested (cut) pieces. Use the density preset dropdown to choose a material type (e.g. MDF, Melamine, Plywood, Wood, Glass, Steel, Iron) or Custom to enter a density value in kg/m³ or lb/ft³ (depending on the unit set in Settings). The preset values match typical densities for each material so you get a reasonable weight estimate in the report.
- Save as default: Save your personal settings (panel size, kerf, margins, density, etc.) as the default for future sessions. These defaults are used when a material does not have its own panel parameters.
Per material vs default: Each material (Rhino layer) can use its own panel parameters or the default values. Defaults are defined in Settings (click Edit next to "Default panel parameters" to open Panel Parameters) and can be overwritten with "Save as default" in the Panel Parameters dialog. To set or change parameters for a specific material, use the piece list dialog: open Panel per material and use Edit or Default for that material — Edit assigns custom panel size and options for that material; Default makes it use the global defaults again.
8. Selected Parts Configurator
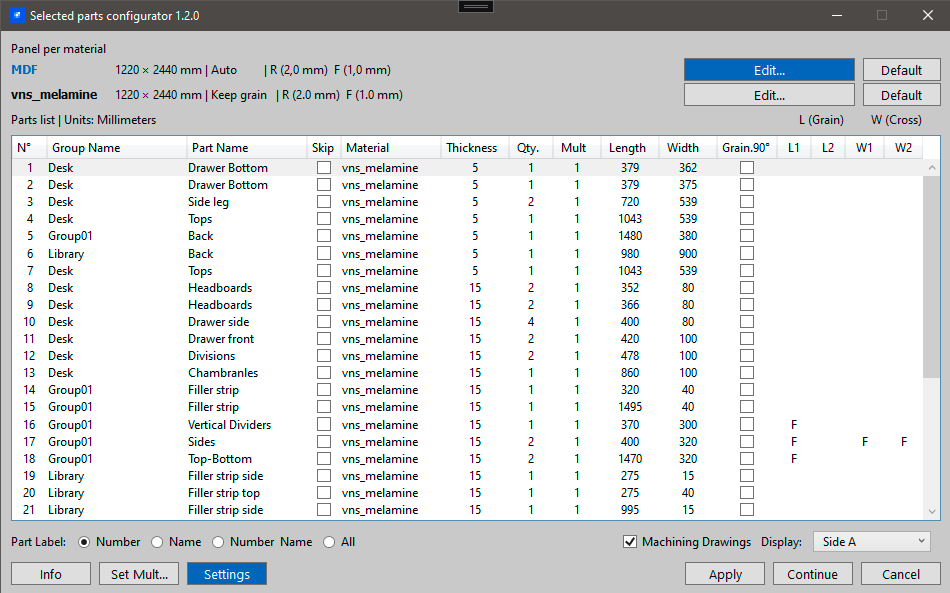
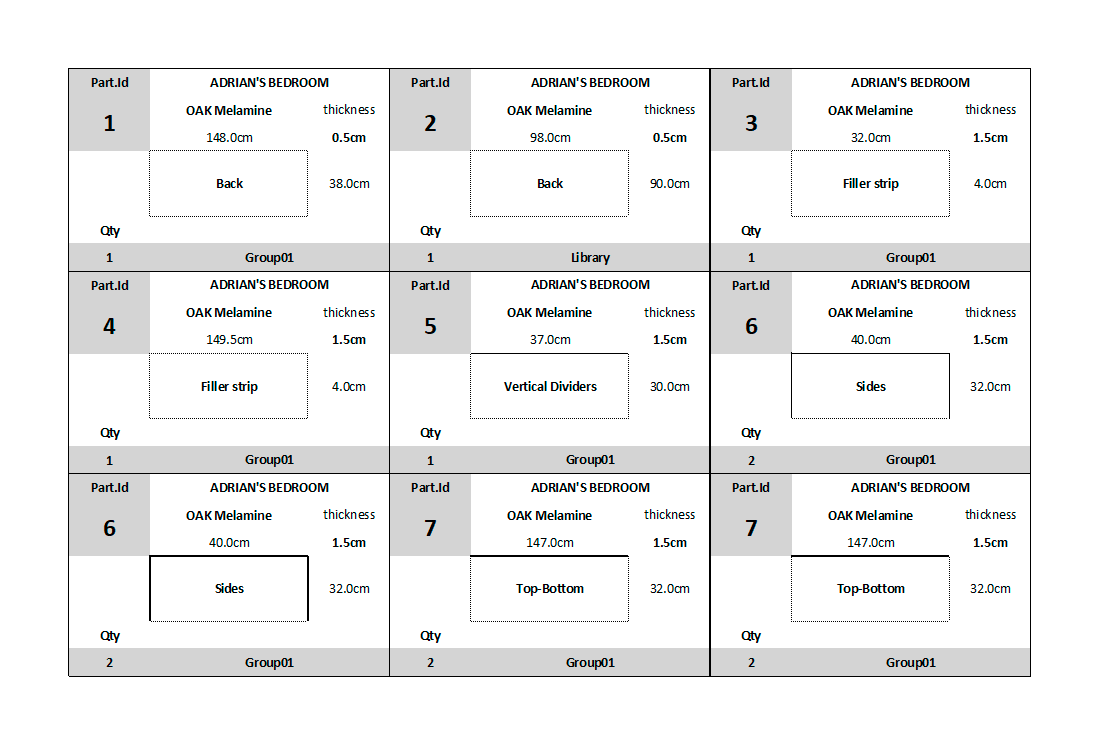
This table shows all selected pieces with their dimensions and allows you to:
- Part Name: Click to edit and give meaningful names (e.g., "Door", "Shelf", "Side Panel")
-
Group Name: Shows Rhino group and subgroup names. Set them with Rhino's
SetGroupNamecommand, or useGroupEdit_FastNestingto browse and rename groups without ungrouping. -
L1/L2 and W1/W2 columns (PRO): Set the edge banding by typing R or F:
- R = Rigid edge banding on that edge
- F = Flexible edge banding on that edge
- Empty = No edge banding
- L1/L2 = the two length-direction edges
- W1/W2 = the two width-direction edges
- Qty: Physical quantity of that part in your Rhino model (how many solids you selected).
- Mult (PRO / Trial): Virtual copies for nesting — nest more instances without duplicating geometry in Rhino. Reports show the nested count; Qty stays the model count. See FAQ — Mult vs Qty.
- Grain 90°: Marks that the piece should use a fixed 90° grain orientation preference during nesting.
- Panel per material (PRO): From this dialog you can set or edit panel dimensions per material (Edit/Default) so nesting uses the right sheet size for each one.
- Part Label: Choose how parts are labeled in the layout and reports: Number, Name, Number Name, or All information.
- Machining Drawings (PRO): When enabled, FastNesting reads machining geometry such as holes, slots, and outlines and draws it on the nested parts.
Important: Exclude parts from processing by prefixing their name with a ! (e.g., !handles). Rename the part in the Rhino modeling space for permanent exclusion, or use the ! prefix in the Part Configurator for temporary exclusion on that execution only.
Apply or Continue saves your entries to each Rhino piece and moves to the next step. You can adjust, cancel, and resume later without issues.
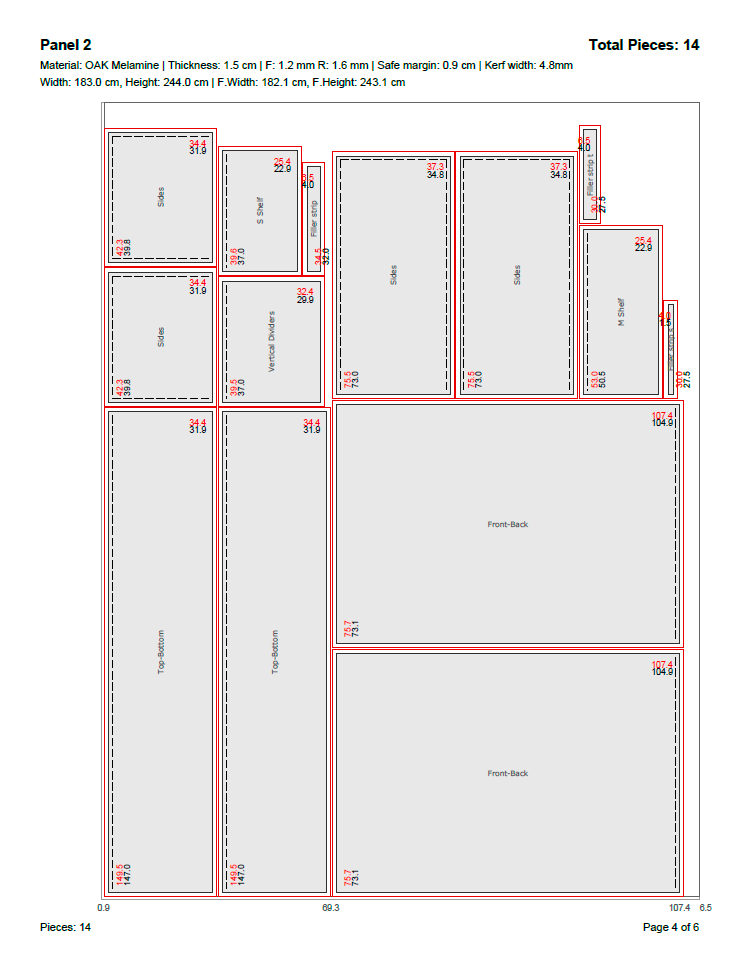
9. Machining Drawings PRO
Machining Drawings reads machining geometry from your Rhino model and draws it on each nested part in the layout. It is intended as a 2D visual reference for holes, slots, outlines, and drill centers alongside the cut plan.
FastNesting can read panel-part geometry and, with Machining Drawings enabled, show 2D machining detail on the nested layout.
- Enable it in the Selected Parts Configurator before running the nesting.
- Use the display options (Piece Namer and layout) such as Side A, Side B, Side A (X-ray), and Side B (X-ray) to control which face shows and when both sides appear at once (face / back views).
- Mirrored instances in Rhino are drawn so machining and edges match shop reality versus a non-mirrored twin.
- If you toggle it on or off, close the dialog and re-run FastNesting so pieces reload with the correct detail level.
- Machining Drawings are visual references for production planning and review; they are not direct CNC machine programs. Always visually verify machining before production.
10. Running FastNesting
A typical nesting run follows these steps:
- Select solids in Rhino (panel parts), or run
FastNestingwith no selection and pick objects at the prompt. - Selected Parts Configurator — review names, edge banding (L1–W2), Mult, grain, panel per material, and Machining Drawings. Click Continue when ready.
- Export Report — choose a report name and which outputs to generate: Rhino layout, PDF, and/or Excel. See §11 Export & Reports.
- Nesting — FastNesting optimizes placement and shows progress. Press Esc to stop a long run. With Keep Grain Direction off, Rotation Priority: Auto (PRO / Trial) compares more layouts per material and keeps the best result.
- Layout drawing — the nested result is drawn in your Rhino document. Very large jobs may show a heads-up before drawing starts.
- 3D piece numbers (optional) — enable 3D piece numbers on source solids in Settings for automatic Text-dot labels after nesting, or run
Show3DPieceNumbers_FastNestingafterward. See §3 Commands.
Configure defaults first in §6 Settings and §7 Panel Parameters so each run starts with the right sheet size, kerf, and units.
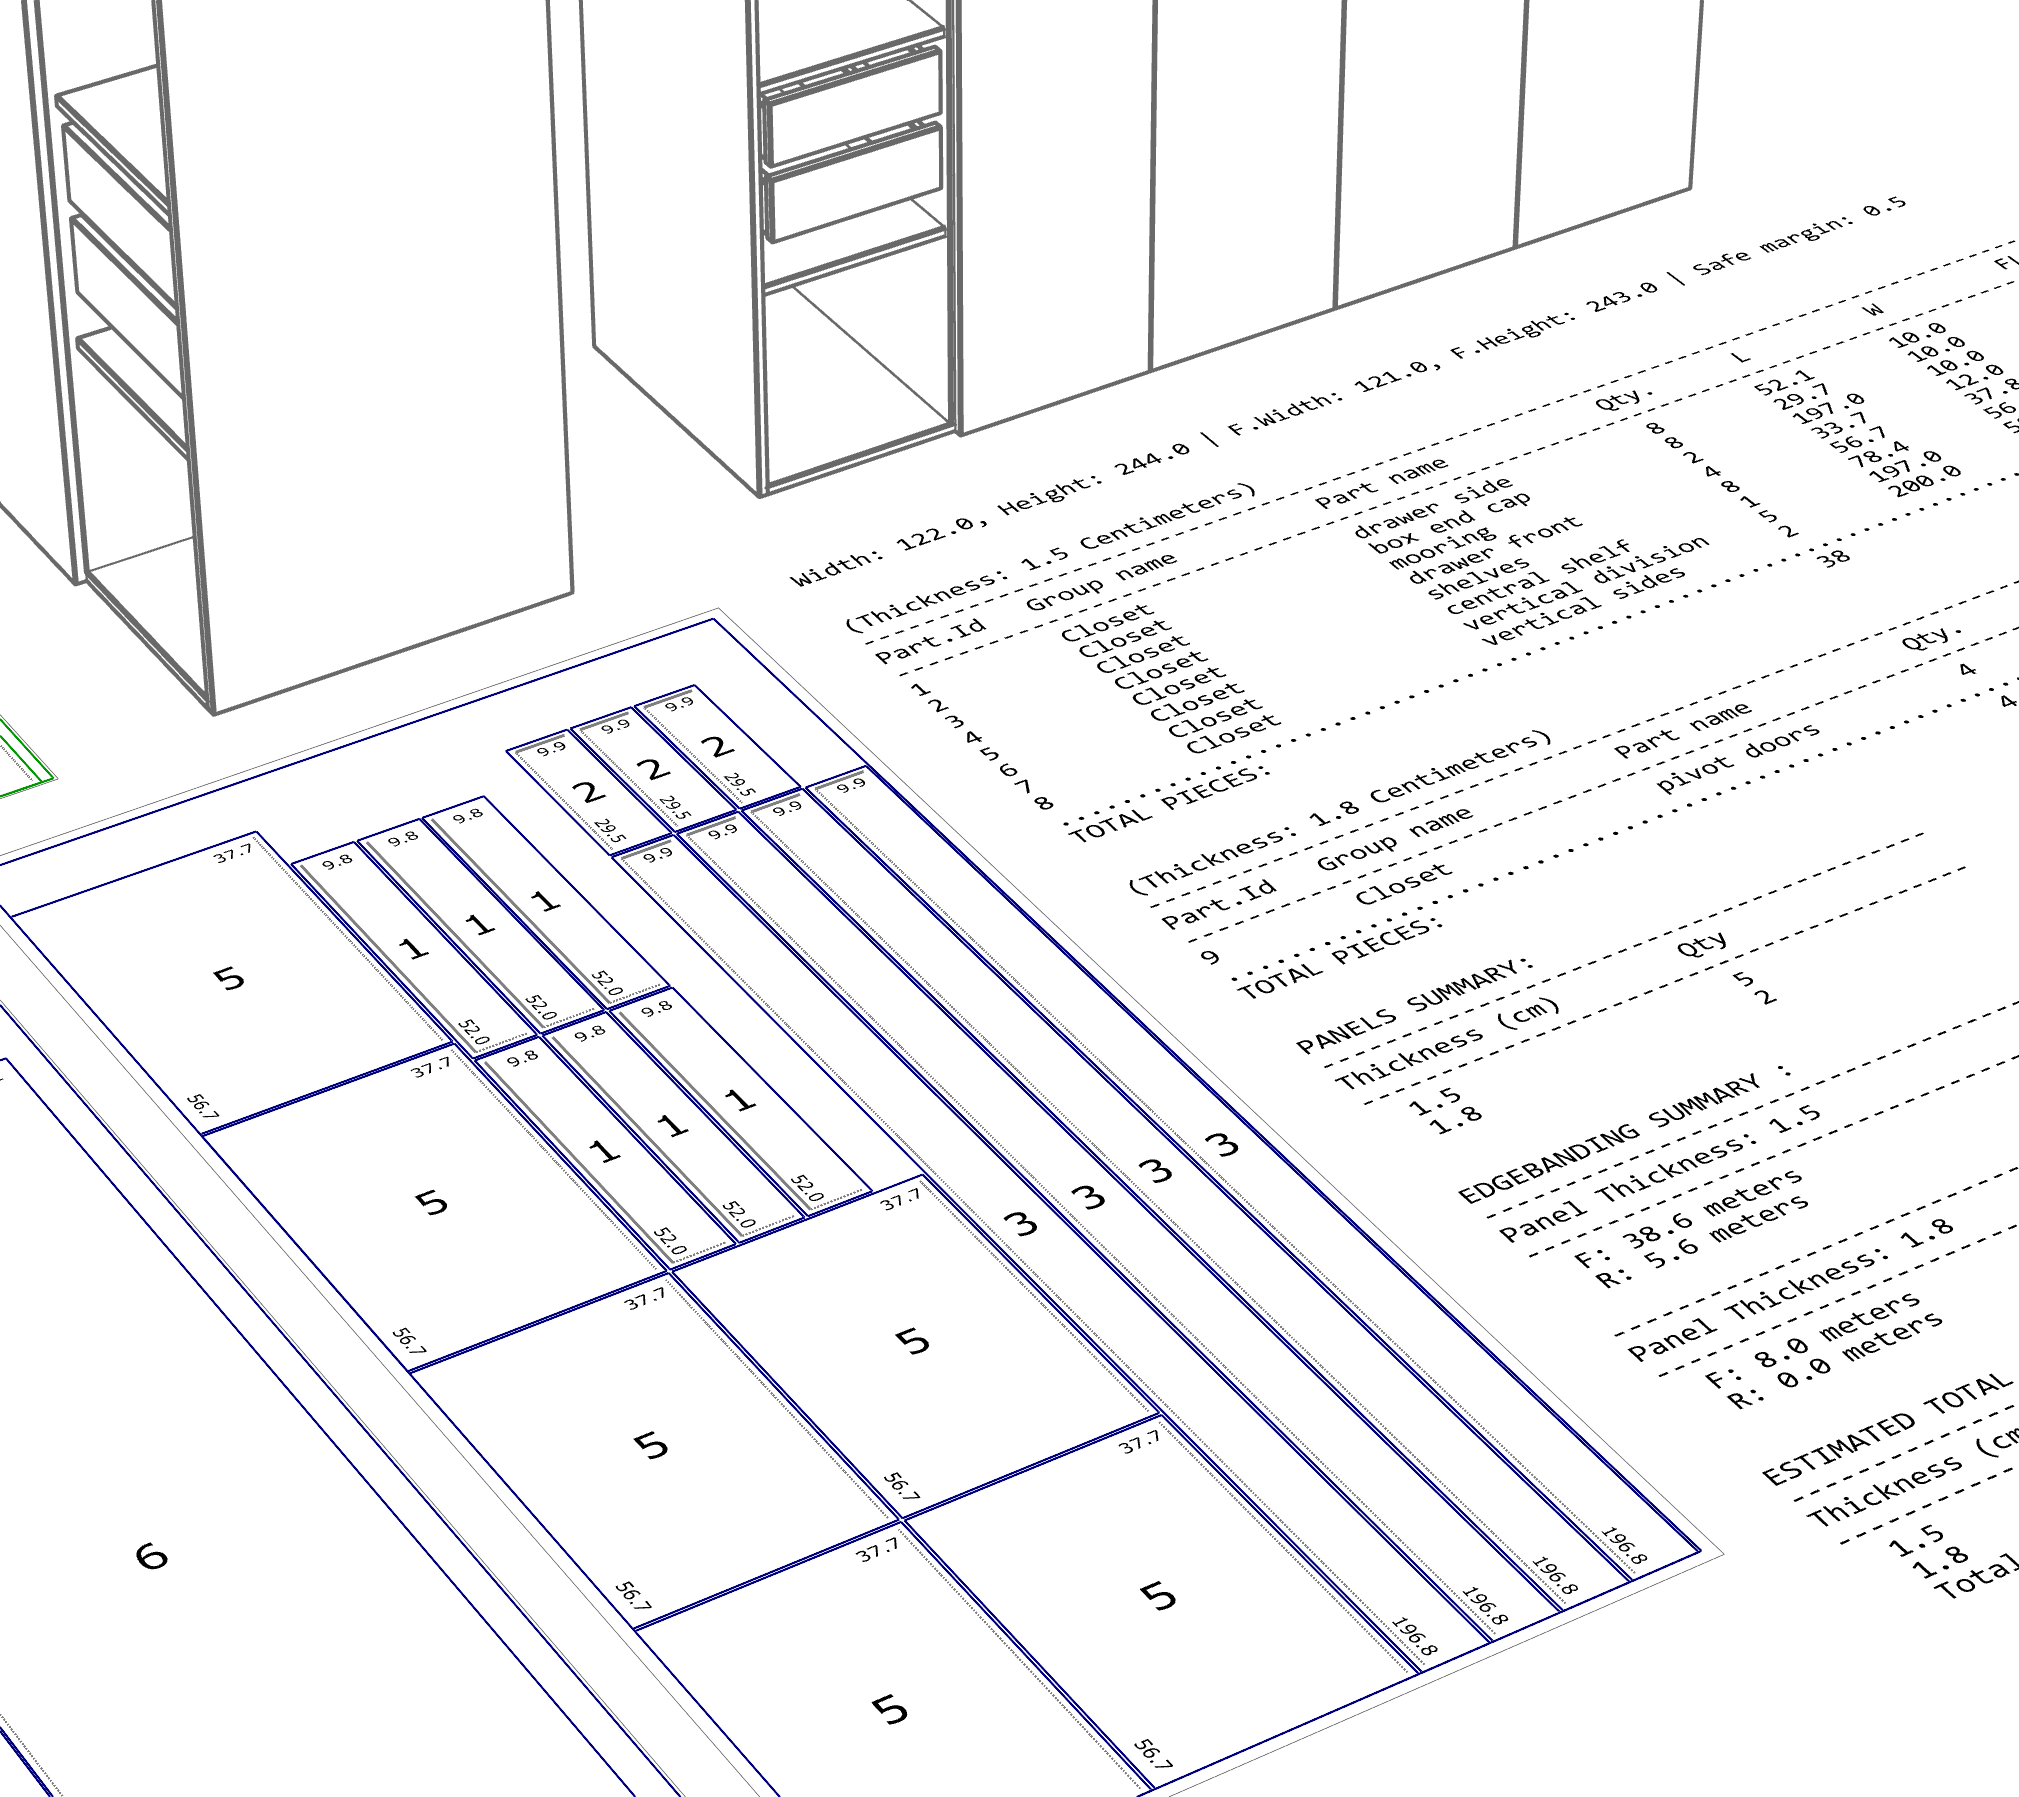
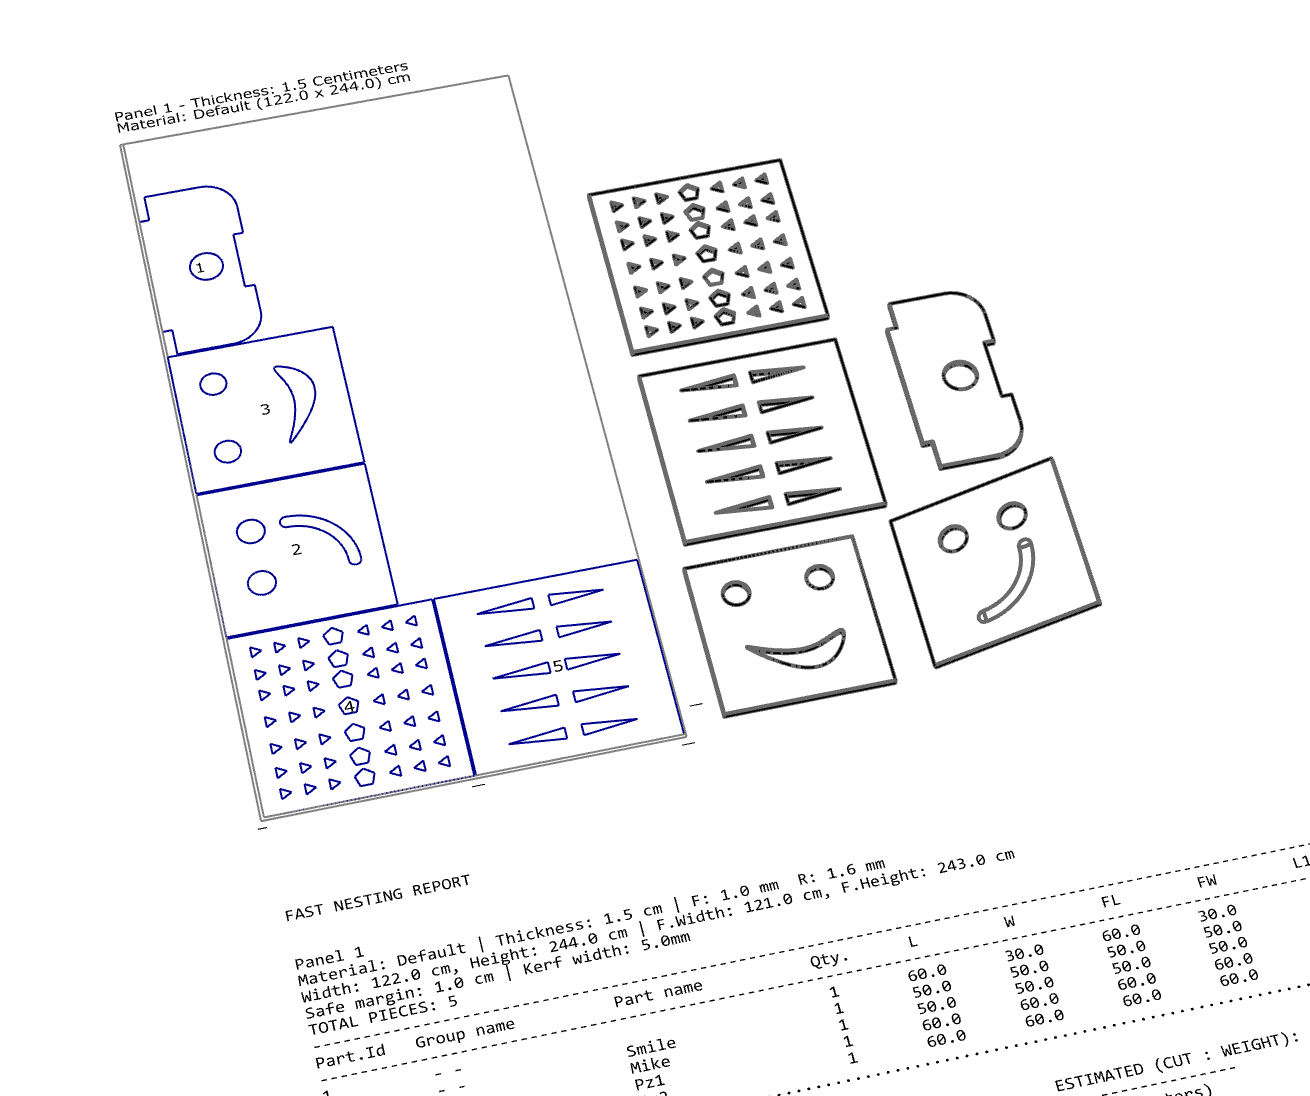
11. Export & Reports
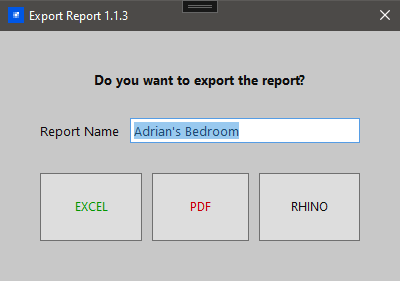
Export Report dialog: define report name and choose Rhino, PDF, or Excel output.
Export to Rhino Document
- Draws directly in active document
- Organized layers by function
- Smart labeling with four modes
Export your nesting results directly to your Rhino document. Perfect for CNC preparation and visual verification.
Available in: Free and PRO versions
PDF Export
- Visual layout with accurate scaling
- Detailed statistics and cut lists
- Piece labels with full information
Generate professional PDF reports with visual layouts, detailed statistics, and comprehensive piece information.
Available in: PRO version only
Excel Export
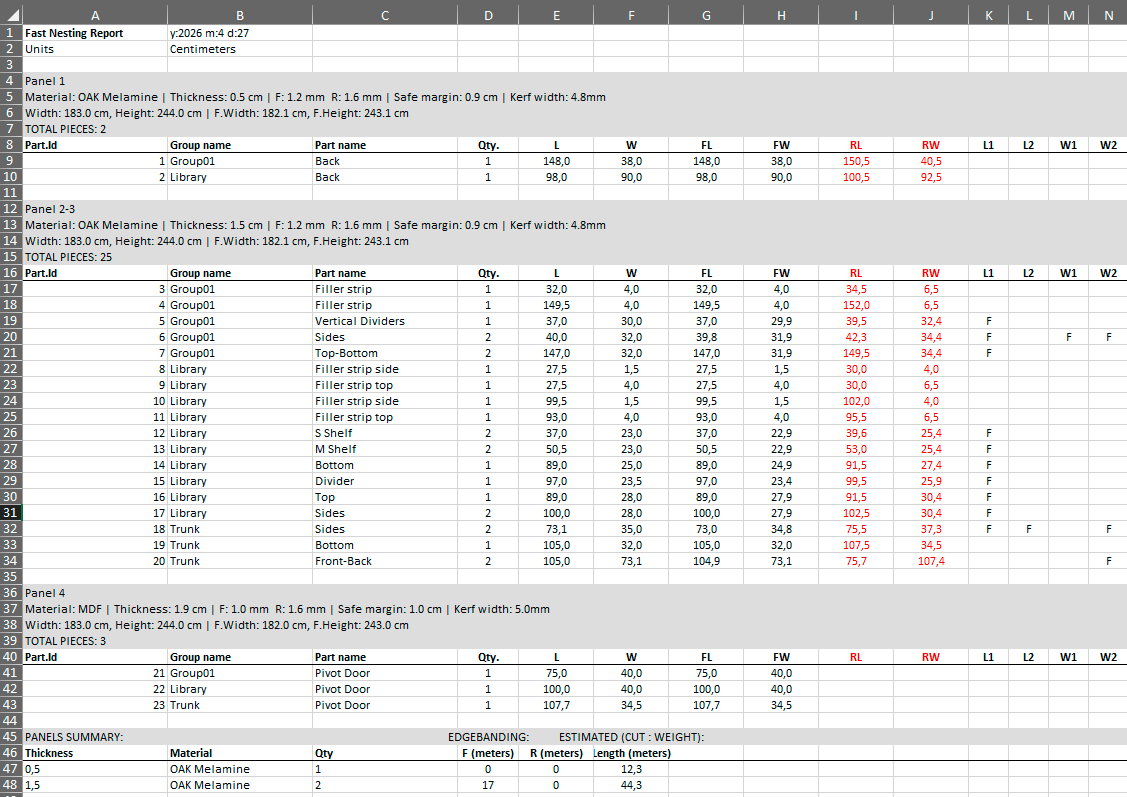
- Detailed cutting lists by material
- Separate sheets for reports and labels
- Accurate cut calculations
Export comprehensive Excel spreadsheets with detailed cutting lists, material summaries, and sticker labels for production.
Available in: PRO version only
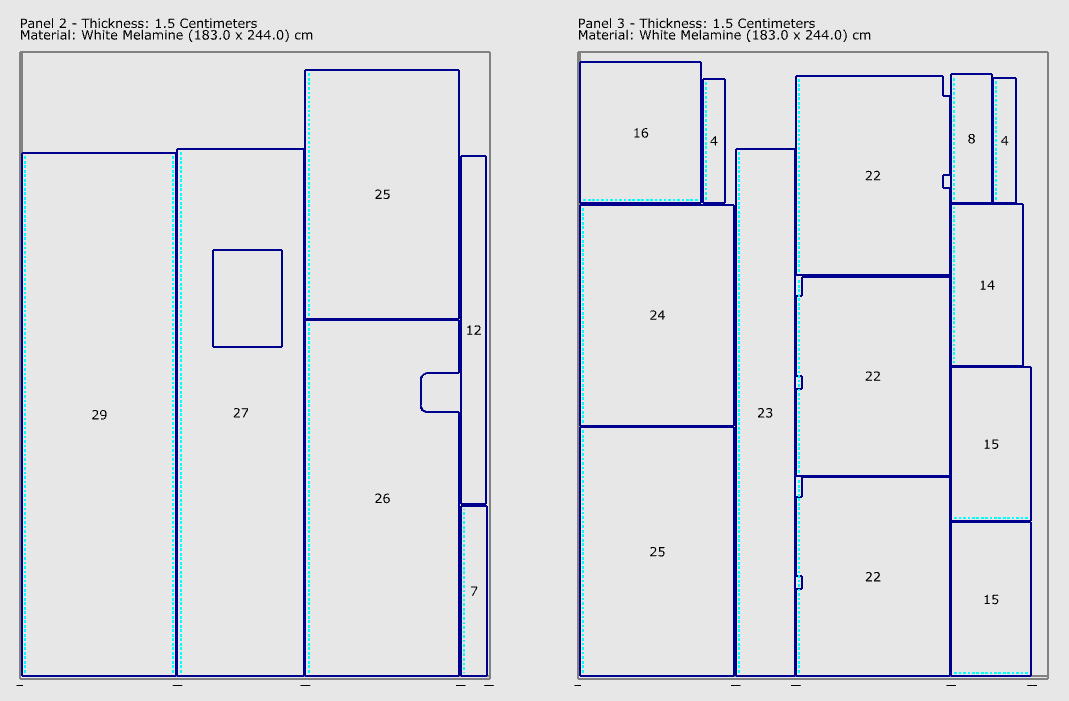
12. Understanding the nesting layout in Rhino
After running FastNesting, the result is drawn in your Rhino document. This section explains how to read the layout: line types, layers, and dimensions (including when roughing is used). For export formats and availability, see §11 Export & Reports.
Line types on the nesting drawing (edgebanding)
The layout uses two line styles for edgebanding on the pieces:
- Continuous (solid) lines indicate R (rigid) edgebanding: the edge is to be banded with rigid/thick banding on that side.
- Dashed (non-continuous) lines indicate F (flexible) edgebanding: the edge is to be banded with flexible/thin banding on that side.
These lines are drawn offset inward from the piece outline and show which side of each edge is to be edge-banded, so you can read the layout at a glance.
Layers created by FastNesting
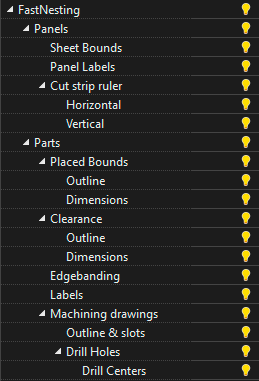
FastNesting organizes the nesting result under a FastNesting parent layer with fixed sublayers:
- Panels → Sheet Bounds (panel rectangles), Panel Labels (title blocks), Cut strip ruler (horizontal/vertical cut positions).
- Parts → Placed Bounds (Outline + Dimensions), Edgebanding (PRO), Labels (part number/name on each nested piece).
- Parts → Clearance (PRO, when Part Clearance > 0): Outline + Dimensions for the rough-cut contour.
- Parts → Machining drawings (PRO): Outline & slots, Drill Holes, Drill Centers. Hiding these sublayers also excludes them from PDF export.
- FastNesting → 3D piece numbers (PRO / Trial, optional in Settings): Text dots anchored on original 3D solids — not the same as 2D Parts → Labels on the sheet. Use
Show3DPieceNumbers_FastNestingor enable auto-labeling in Settings; see §3 Commands.
Toggle sublayer visibility in Rhino to show or hide specific elements for plotting or export.
Double dimensions when roughing is applied
When a Part Clearance is set (PRO), each piece has an outer rough contour and an inner finish contour. The layout and reports can show two dimensions for the same edge:
- Rough (outer) dimension: the size to cut first, including the roughing allowance.
- Finish (inner) dimension: the final size after trimming or machining.
Both may appear on the Rhino drawing and in the PDF so the workshop knows which dimension is for the rough cut and which for the finish cut.
Smart Labeling System
FastNesting offers four labeling modes to suit different production workflows:
Numbers Only
Clean, minimal labels showing only piece numbers for efficient CNC operations.
Names Only
Descriptive labels showing only piece names for easy identification during assembly.
Number + Name
Combines the part number and name for shop-floor identification with compact labels.
All Information
Complete labels including numbers, names, groups, and dimensions for comprehensive documentation.
A. Best Practices
1. Name Your Pieces During Modeling
It's a good idea to name your parts when modeling in Rhino (Right panel - Properties:Object / name). Use descriptive names like "Doors," "Left_Door," "Top_Shelf," "Rear_Panel." However, you can also name each part in the Part Configurator. Remember, if you don't want a part to be considered for the process, you can name it by placing a ! before the name, for example, !handles.
2. Group and Set Group Name: Pieces by Project
Group parts by project for clear organization across sheets. Each project can include multiple sheet thicknesses, all tracked in the final report.
Use Rhino's SetGroupName command or GroupEdit_FastNesting to rename groups and subgroups without ungrouping.
3. Double-Check Your Units
Verify that the report units in Settings match how you want cut lists and labels to be shown. Mixing centimeters and inches can easily lead to confusion or incorrect scaling.
4. Set Accurate Blade Kerf
Use the real cutting width of your tool (saw or CNC). Make a test cut to determine the exact kerf, or use a slightly higher value as a tolerance.
5. Be Careful with Grain Direction
When using "Keep Grain Direction" and rotating individual pieces (Grain 90°):
- Treat Grain 90° as a fixed 90° orientation preference, not as free rotation
- Verify L1/L2/W1/W2 edge banding against the visual result after nesting
- Check the visual result in Rhino before exporting or printing
6. Distinguish similar pieces
If you have multiple pieces of the same size but different edge banding, give them unique names. Otherwise they may be grouped together in the report.
For same-size pieces with different machining or mirror pairs that should get separate numbers, enable Distinguish by machining in Settings (PRO). Machining signatures always separate clearly different hole/slot patterns when the option is relevant.
7. Save Settings as Default
In the Panel Parameters dialog, check "Save as Default" to reuse your common settings (sheet size, kerf, margins) in future sessions.
13. Troubleshooting & Support
Command "FastNesting" not found
Possible causes:
- Plugin not installed correctly
- Rhino version incompatibility (need Rhino 7 or 8)
Solutions:
- Type
PackageManagerand verify FastNesting is listed - Try reinstalling by dragging the .yak file onto Rhino
- Check Rhino version: FastNesting supports Rhino 7/8 on Windows and Rhino 8 on macOS
License activation fails
Solutions:
- Verify you're using the same email address you used for purchase
- Copy-paste the license key to avoid typos
- Check that you have internet connection (required for activation)
- Make sure license key format is correct: XXXX-XXXX-XXXXX-XXXXXXXX
- Contact support@camonsoft.com if issue persists
Pieces don't fit on panels
What happens:
If some pieces are too large for your panel size, they won't be included in the layout. You'll see a message in the report indicating which pieces couldn't be placed.
Solutions:
- Use larger panel sizes
- Split large pieces into smaller sections in your model
- Check blade kerf and margins aren't too large
- Verify your units are correct (cm vs inches)
Measurement inconsistencies
Most common cause:
Wrong unit selection. If your Rhino model is in centimeters but you export reports in inches without noticing it, measurements can be misread.
Solutions:
- Check your Rhino document units: Type
Units - Select matching report units in
Settings_FastNesting - If measurements are exactly 2.54x off, you mixed cm and inches
2D machining drawing does not match the 3D model
What happens:
FastNesting reads the geometry directly from the Rhino solid to generate 2D machining drawings. If the source object has geometry problems — such as flipped normals, non-manifold edges, open surfaces, or self-intersecting faces — the plugin may misread face orientation or boundaries, producing a 2D representation that does not match what you expect.
Solutions:
- Before nesting, check your solids for geometry issues: in Rhino, select the object and run
CheckorSelBadObjects - Fix flipped normals with
Dirand flip any inverted faces - For non-manifold or open edges, try
Join,RebuildEdges, or remodel the piece as a clean closed solid - Always visually verify the 2D machining drawing against the 3D model before sending to production
B. Purchase & invoice (business details & VAT)
Payments are processed securely by Paddle (our merchant of record). If you need your company name, VAT / tax ID, and billing address on the tax invoice, you can add them during checkout.
Where to enter business details
- On our checkout page, choose your product and enter your email and name, then click to open the secure payment window.
- Enter your email and country on the first step, then click Continue.
- On the payment step (card or PayPal / Google Pay), look at the order summary on the left. Below the VAT line you will see a link: Add VAT number.
- Click Add VAT number. A form opens where you can enter your VAT number, company name, street address, city, state/county, and postcode (fields may vary slightly by country).
- Complete the payment. Those details are included on your Paddle tax invoice.
The Add VAT number option appears on the payment step (after Continue), not on the first screen—look for it in the left-hand order summary next to the payment form.
If you need help after purchase, contact support@camonsoft.com.
C. Frequently Asked Questions
How does the trial period work?
A new install starts in PRO trial for 10 calendar days (no Rhino session counter). In version 1.2.0, eligible Free users who update may also be offered a fresh 10-day PRO trial through the welcome dialog — opt in with your email if you want it.
When the trial ends, FastNesting switches to the Free edition unless you activate a PRO license.
What happened to Regeneration mode?
Regeneration mode let you rebuild Excel and PDF reports from an existing nesting layout in Rhino without running the nesting solver again.
New features in FastNesting changed how layout data is stored and processed. Re-exporting older nestings without a fresh run could produce undesired or unreliable results (wrong piece lists, mismatched labels, or incomplete reports).
Regeneration mode was removed from release builds starting with version 1.2.0. It is not part of the current workflow.
Workaround: run FastNesting again on your parts to generate fresh PDF and Excel reports. We may introduce an improved report workflow in a future release.
What is the Mult column? How is it different from Qty?
Qty is how many physical copies of that part exist in your Rhino model. Mult (PRO, since 1.2.0) asks FastNesting to nest additional virtual copies without duplicating solids in Rhino — useful when you need more instances on sheets than you modeled. The Excel/PDF report shows the nested quantity; Qty in the configurator stays tied to your model.
What happens after the trial expires?
After the trial ends, FastNesting switches to the Free version. In Free you can:
- Run nesting with up to 16 pieces per nesting
- View and use the nesting layout in Rhino
- Use the plugin to measure and work with pieces
Free does not include: edge banding (R/F) calculation, PDF or Excel export, Machining Drawings, panel parameters per material, Part Clearance, estimated weight in reports, or 3D piece-number labels. You can upgrade to PRO at any time from the license dialog or from our website to unlock all features.
Can I use my license on multiple computers?
It depends on which license you bought. FastNesting is available in two options: One Seat (one computer) and Three Seats (up to three computers). Both use a single license key tied to one email address — you activate each computer with the same credentials. Check your purchase confirmation or the license dialog in the plugin to see how many activations your license allows.
Do I need internet to use FastNesting?
Internet access is required for PRO license activation and deactivation. Normal nesting work continues offline after activation.
Is the PRO license lifetime?
Yes! Your PRO license is lifetime for that version of FastNesting. You'll receive free updates to that version. If a major new version is released in the future, you can continue using your current version or purchase an upgrade license for the new version.
Can I get a refund?
You have the 10-day PRO trial to fully test FastNesting before buying, so you can try all features and know exactly what you're getting. We don't normally process refunds because of that. If you still need to reverse your purchase, our payment processor allows chargebacks or refund requests within 1 to 2 weeks after the purchase; contact us or use the option provided by the processor within that period.
Which Rhino versions are supported?
FastNesting works with Rhinoceros 7 and 8 on Windows. On Mac, only Rhinoceros 8 is supported.
How do I reset all settings?
Run Clean_FastNesting, press Enter without selecting any objects, then choose Yes to restore all FastNesting settings to their default values. Restart Rhino afterward so that dialogs show the updated values.
Where is FastNesting available?
You can get FastNesting in three ways: from Food4Rhino (the official Rhinoceros 3D plugin marketplace), from our website, or directly inside Rhino via the Package Manager (PackageManager command, then search for FastNesting). All three options provide the same plugin; choose the one that suits you best.
How many pieces can I nest in PRO version?
PRO does not publish a fixed piece-count cap. You can nest large jobs typical of cabinet and furniture production. Practical limits depend on Mult values, geometry complexity, and your computer. The Free edition remains limited to 16 pieces per nesting after the trial ends.
Does FastNesting have a toolbar?
No. FastNesting is command-based. Simply type FastNesting to start. This keeps your Rhino interface clean and works consistently across all Rhino versions.
What export formats are supported?
FastNesting can export to Rhino Document (all versions) for visual reports, PDF (PRO only) for professional layouts with statistics, and Excel (PRO only) for detailed cutting lists with accurate calculations.
Should I verify the 2D machining drawing before production?
Yes. FastNesting reads geometry directly from the Rhino solid, so the quality of the 2D machining drawing depends on the quality of the 3D model. Objects with flipped normals, non-manifold edges, or open surfaces can produce unexpected 2D representations. Always compare the 2D machining drawing with the original 3D model before sending to production.
What can FastNesting PRO do?
With a PRO license, FastNesting offers:
- Large-scale nesting with optimized layouts grouped by material and thickness (no published piece-count limit for PRO).
- Machining Drawings: 2D machining details (holes, slots, outlines) with Side A, Side B, and X-ray display modes. Mirrored parts are drawn correctly.
- Edge banding (R/F): Calculates and groups rigid and flexible edges per piece. Presets include 0 mm for BOM-only traceability.
- PDF & Excel export: Professional cutting layouts, stickers, and detailed cut lists.
- Panel parameters per material: Different panel sizes and settings for each material.
- Part Clearance & estimated weight: Optional cutting margin per piece with weight calculations in reports.
- Smart Labeling: Four modes — Number, Name, Number + Name, and All information.
- 3D piece numbers: Optional Text-dot labels on source solids after nesting; command
Show3DPieceNumbers_FastNestingto find parts by list number. - Mult: Nest additional virtual copies without duplicating solids in Rhino.
- Rotation Priority Auto: Compare more layouts when grain direction is off.
- Seat management: Release a remote seat and activate this computer when your license limit is reached.
Can I suggest new features?
Yes! We love hearing from our users. Send your feature requests to support@camonsoft.com and we'll consider them for future updates.
Need More Help?
Can't find what you're looking for? Our support team is here to help you get the most out of FastNesting.